Showing posts with label Inventor. Show all posts

7 Oct 2014

Can't move, promote or demote Inventor Content Center Part

When you insert certain content center parts in to an assembly you may find that there are certain functions not available to use on these parts. Inserting a tube and pipe fitting for example will insert an instance that has the restructuring commands disabled, promote/demote typically. Why? 
These parts are intended to be used in a tube and pipe assembly where these commands will break the functionality so are automatically limited. What happens though when these parts have been inserted as dumb components not in a tube and pipe assembly and you want this functionality.
This is where you can take advantage of the Inventor API and macro functionality.
The simple code below the image will loop through all the components in the assembly and remove any reorder command restrictions - be careful you don't run this on an assembly that is a tube and pipe run assembly though.  


Public Sub removedisabledcommands()

Dim odoc As AssemblyDocument
Set odoc = ThisApplication.ActiveDocument
Dim oOcc As ComponentOccurrence
   
For Each oOcc In odoc.ComponentDefinition.Occurrences
    If oOcc.DisabledActionTypes = kReorderAction Then
    oOcc.DisabledActionTypes = kNoAction
    End If
Next oOcc
End Sub
 
Alt+F11 for the Macro Editor to add this code (application project not document project)
Alt + F8 for the Macros list to access to run it in the application
 
Graham Harrison

Automatically Save Inventor Drawing to PDF


Want to save your Inventor drawing to PDF on every save? or DWF, DWG, or DXF?
Want the option to automatically save it to a different folder and add the revision, or any other property, to the name.

You can. All you need is Micro Concepts Inventor Tools installed and you can configure this functionality.
An add in to Inventor, Inventor Tools will add a new Micro Concepts ribbon to your toolbar.


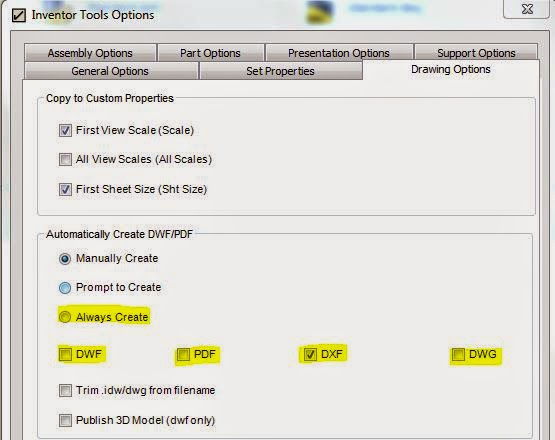
You will find the configuration settings in the options - the button with the tick!

On the Drawing Options tab you can set the option to always create, on save, any combination of DWF, PDF, DXF, DWG. There is also an option to prompt you to create when save rather than automatically, or you can set it to manually create which will create the files when you select the Auto Snapshot command.


Nice and straightforward it remembers the last manual save options for these file types and uses those settings. So if you need an AutoCAD 2000 DWG format file automatically saved every time, just save it once manually and it will then be remembered as the format to use.

But how do you control where the PDF file is saved to?
Just go to the general options tab and here you can control the file location copying the existing folder hierarchy, or keep it in the same folder as the drawing file.


You have the option to replicate the file name exactly or you can append the revision, or any other property combination to the end of the filename. You can completely replace the Inventor filename with a different name for the PDF, if you have properties you want to use instead.

As well as drawings, there are also options on the assembly and part tabs to save out dwf and step files.

Available since Inventor 7 the Inventor Tools grow and evolve from the feedback of users. Any feedback is welcomed and encouraged.

Micro Concepts Inventor Tools is provided in the UK as a benefit of the Micro Concepts Support Contract.

Graham Harrison


16 Sept 2014

Inventor 2015 Service Pack 1


Autodesk have released the first service pack for Inventor 2015.

There are various fixes listed in the Readme, but the list extends beyond this as several of our customer reported issues which are now fixed although they haven't been documented

As always, Micro Concepts recommends to update to the latest version at your earliest convenience.

You can find the download here:

http://knowledge.autodesk.com/support/inventor-products/downloads/caas/downloads/content/autodesk-inventor-2015-service-pack-1.html?v=2015

22 Apr 2014

Inventor 2013 SP2 Update 5


This update is again, cumulative so go straight to this if you do not have Updates 1-4, but ensure you have SP2 installed.

The download and readme's can be found here:
http://knowledge.autodesk.com/search-result/caas/downloads/content/update-5-for-inventor-2013-service-pack-2.html

Inventor 2014 SP1 Update 3

Another cumulative update for Inventor 2014 SP1 i.e. if you don't have Update 1 or 2 yet you can ignore them and go straight to Update 3.  You do need SP1 installed, however.

The download and readme's can be found here:

http://knowledge.autodesk.com/support/inventor-products/downloads/caas/downloads/content/update-3-for-inventor-2014-service-pack-1.html

10 Apr 2014

Installations and You, 2015


It is that time of year again!  The 2015 product releases are starting to trickle out on the subscription site, and many of you will be taking advantage and adopting early.  Whether you are keen to try out the new features, or just to take comfort in being at the latest version, it will pay dividends to pause for thought and consider the following before your itchy trigger mouse finger tries to cash cheques that your smooth-running design office can't handle.
Backup your data

Firstly, the Vault.  This is the most important one not to get wrong.  The potential for unexpected downtime while efforts are made to restore functionality is fairly high, and there is the possibility of data loss.
Pose these questions to yourself, or the IT individuals involved in your upgrade/install:

- Do you have experience with the installation or upgrade of Vault and are aware of the potential pitfalls?
- Have you read the installation guide, cover to cover?  There's a lot of content in there and it is all important.
- Do you have an understanding of how Vault relates to SQL Server?
- Do you know the part that IIS plays in your set-up?

If you answer no to any of these questions then you need to either put in some time to understand what is required prior to your install, or get an experienced professional involved.
Backup your data

When it comes to Inventor, there are some important aspects to consider particularly when upgrading.  Backing up your Application Options is just the tip of the iceberg:

- Do you know which resources are shared on your network and how to back them up?
- Do you understand which non-shared resources get completely replaced during an upgrade and how this might affect your projects?
- Are you aware of the migration process in its various forms?

Then there is licensing.  Do not mix up single and network at the install - a mistake here will likely lead you to reinstalling the entire suite (the registry can be modified instead but only if you are confident in knowing which keys to change, and this has to be done for every individual application).
Backup your data

- Do you have your new license file, with the correct server information?
- Do you need to upgrade LM Tools?
- Can your clients communicate with the license server and do you know how to diagnose if they can't?

Micro Concepts support line will be available to offer advice on any specific queries you have with your installation.  If you are certain that you want to proceed on your own then we would advise clearing up any gaps in your knowledge before you do and give us a call to run things through.
Backup your data

Unfortunately what we cannot do is guide you step by step or run installations remotely.  This is due to the length of time the actual installation process takes and this can become much longer when issues arise, the diagnosis of which is compounded by the sheer number of variables that could be the cause.  For Micro Concepts to be involved any deeper than an advisory role it is necessary to arrange a site visit.  If you choose to hire the services of another contractor, make sure you confirm with them that they absolutely know what they are doing!

Finally:  Backup your data!


4 Dec 2013

Inventor 2013 templates overwritten on application options import

An issue with Inventor 2013 templates has appeared where the custom templates you create are being overwritten by the factory set defaults when you import application options.

One option as a protective method is to set your template to Read Only, however this is not ideal for those utilising custom templates on a network.

A simple workaround is to set the default template located on you local drive (the default template). However in the project the template would continue to be set as the shared templates folder.

This set up should prevent your custom templates form being mistakenly over written.


Step one is to access your Application options in Inventor - under the file tab make sure the default template is using the path way to your local drive. It should be like the following explorer link:
C:\Users\Public\Documents\Autodesk\Inventor 2014\Templates
Or follow the folder options on the right hand side of the image above.


Step Two is to make sure your Project templates folder is directed at the custom templates located on your network drive. The project setting overrides the setting in the application options.

Also if you find other times that your templates are overwritten this will often come about by changing the default template settings in the application options or in the start up screen. If you already have your templates created and set correctly then there is no need to change this option.


29 Oct 2013

Inserting Inventor DWG views into AutoCAD

When you open an Inventor DWG in AutoCAD, it opens in Layout view.  If you would like to work on it in Model space, you can do so with the DDINSERT command.

1) Open the Inventor DWG in AutoCAD.  It will open in Layout view.


2) From Model space, type DDINSERT.  The Inventor drawing should automatically be selected.


3) Choose which view from the drawing you would like to insert from the drop-down Name menu.

4) Adjust your insertion and scale settings


8 Oct 2013

Woodwork for Inventor

Have you heard of the Woodwork for Inventor add-in yet?

This powerful upgrade to Inventor brings custom functionality for the design of furniture, cabinets, and joinery with specialist commands and environments such as edge banding, veneer directions and CNC preparation.

Graham Mansfield will be hosting webinars where you can tune in and see the software in action, so head on over to the site and register now:

Woodwork for Inventor Webinar

In the mean time, you can view a selection of videos listed on our main page

7 Oct 2013

Inventor Tip - Indented Parts List


Peter Barker - Micro Concepts Ltd


It used to be the case in previous versions of Autodesk Inventor that when you placed a parts list on to a 2D drawing of an Inventor assembly the parts list could be edited and there was a little plus next to the sub-assemblies so that they could be expanded (or not) as desired:


There is indeed still an option to place a parts list in this fashion and the name hints at its history: Structured (Legacy).


This then shows what I would refer to as an indented parts list:
 
So that’s great if you know you want to do that as you place the parts list onto the drawing but what if you decide to do so after you have placed it? You can’t edit the style of the parts list right?

Ok so just delete it and re-place it but of course this problem is exacerbated if you have placed the balloons because they will need to be deleted too.

If you have placed a Structured parts list (not legacy) and now you want to create an indented parts list do the following:

Right mouse click on the parts list and select Bill of Materials.

The Bill of Materials window will launch, in this window select the Structured tab. And from the View options drop down list select ‘View Properties’.


In the Level drop down select ‘All Levels’.


OK the structured properties dialogue box.

Select Done on the BOM Dialogue box.

Double click the parts list in the drawing and you should now have the ‘plus’ signs next to all the sub-assemblies so that they can be expanded.

4 Oct 2013

Inventor Tip - Rotate Leader Text

The Format Text dialogue for Leader Text can be quite misleading.  There is an apparent option to rotate the text, but it is  always greyed out.  This is because the form of the dialogue mirrors the standard Text dialogue box where it is an actual option.

In order to rotate leader text you need to edit the Dimension Style

Leader text alignment is not controlled by the Leader tree in the Styles Editor, but is found in the end tab in the Dimension tree:


Change the selection of the Leader Text Orientation drop-down box to "Aligned", as shown in the picture above.  Remember to save the style, and save it to the library if you want to use it globally across Inventor.

Now when you place a leader, make sure you place at least two line segments after the insertion point, as it is the end vertex of the second segment that can be used to rotate the leader text into the desired position:


This method should suffice for most situations, but if you require more options then look into creating a Sketched Symbol in your drawing, and save it to the template if you wish to re-use it across new drawings.

Peter Barker also reminded me to mention that whilst this works for leaders there are similar settings available to rotate text for Linear, Diameter and Radius Dimensions as shown in the following image.

3 Oct 2013

Inserting drawings into older Autodek software

On a day to day basis on the support Help desk at Microconcepts we get a fair few people asking how they can transfer or save their Inventor files in older versions of software. For example using Inventor 2013 and you need to open the drawing in AutoCAD 2012. 

From the Inventor idw, we can go to 'Save Copy As' via the 'Save As' tool in the Inventor home button. Now making sure you've selected the correct file format. If you move the cursor over to 'Options' on the bottom right hand corner of the 'Save Copy As' window and left click. 


Within Options you will be presented with pull down box options. Select the box under file 'File Version' in here you can select the software format you need that pre-dates the Software you are running. 


2 Oct 2013

Inventor 2014 Service Pack 1

The first Service Pack for Inventor 2014 is now available for download:

Inventor2014_SP1_x86.msp (49272Kb)
Inventor2014_SP1_x64.msp (93768Kb)

Some of the issues addressed in this update (please consult the Readme for the complete list):

    Autodesk Inventor Professional 2014

      Cable & Harness
      • For some particular dataset, after placing a nail board view of a Cable & Harness assembly in a drawing file, Inventor unexpectedly exits when you close the drawing file without saving and then closing Inventor.

      Stress Analysis
      • Contacts in solids and faces at vertices are identified as face-face contacts. 
    Autodesk Inventor 2014


      Assembly Modeling
      • Cannot make a weldment iAssembly material valid as a weldable material. 

      Design Accelerator
      • Bolted connection does not update automatically when you repostion its location by changing the placement sketch point.

      Part Modeling
      • In the Insert iFeature dialog box, the help button is disabled if the iFeature is created with a legacy localization build.
      • iPart members do not show sketch and block definition.
      • iPart created from a feature with no dimension generates empty children.
      • When you measure distance in an iPart member, on the context menu Select Other is grayed out.
      • Mass calculation fails for a part that uses unpatched Rhino surface data.
      • ... more in the Readme

      Sketch
      • Cannot switch on and off the visibility of a sketch block when you edit the sketch.
      • Cannot create a coincident point when you attach a line to a projected point.

30 Sept 2013

Simple but often asked dimension problems in Inventor

While using Inventor many people often ask for various tips on dimensioning circles and similar shapes. Often we find that a circle will automatically dimension itself from the centre point to the allocated line, projected line or component. However there is such a way we can dimension to the outer edge of the circle or form one tangent point of a circular sketch to another.

The first option is to dimension from a projected or sketched line to the circle edge. First simply select the constrain feature (in this case the straight line) and then hover the mouse over the circle edge at which you can allocate a dimension distance. The icon next to the mouse will display a small "distance to circle edge" symbol rather than the usual distance symbol.

The second part of the video shows a circle within a circle option. Often like before a single click on the two circles will only off an option to dimension from the centre of each circle. However when selecting sketch edges hold the 'Alt' key while doing so and this will allow you to dimension from edge to edge of each circle.


Thanks once again to Peter Barker for this great tip.

28 Aug 2013

New NVIDIA Quadro v320.78 drivers with Inventor Base Profile support


NVIDIA


Quadro v320.78 WHQL
 

Windows 7
32-bit

64-bit


Windows Vista
32-bit

64-bit


Windows XP
32-bit

64-bit
 
Top Release Highlights*

Performance increase with Adobe Premier Pro CS7 Lumetri and AVID Motion Graphics.

Fixes application launch issues with NVIDIA Nsight.

Fixes application irregularity with Inventor when using Base Profile.

*May not apply to all O/S & Product configurations.


Note: Before downloading and installing a new driver, please check to confirm that your system includes a supported NVIDIA GPU (refer to the list of Supported Products in the Release Highlights section on our website). You can also use our automatic driver scan (refer to the Driver section on our website) to find the latest driver for your NVIDIA GPU. Download links in this notification will point to the latest driver available.


13 Aug 2013

Vault Ribbon disappears in Inventor 2014

There is currently an issue that the Vault Ribbon in Inventor 2014 disappears after doing some interactions in Inventor 2014:
RibbonDisappears
Workaround:
Open the Add-In Manager in Inventor 2014 and "Show Hidden Members":Addin-Manager

You will see that there are 2 EDM Addins.

Go to the EDM Addin with the location mscoree.dll and untick the Load Automatically option.
Restart Inventor and double check the EDM Addin (mscoree.dll) the "Loaded/Unloaded" and the "Load Automatically" should be unticked.
Now the issue should be resolved.
Thank you very much to Daniel Stockinger who shared this workaround!
This was originally posted (in German) here.

8 Aug 2013

Moving a part to the origin


Curtis Waguespack has a great article over on his website that details the procedure for moving a part to the origin of your drawing. 

While he places emphasis on the use of this for imported parts, it's also extremely useful if you have created a part in an assembly with respect to other parts and then want to re-use it in other assemblies (parts created with reference to other parts assume the origin of the parent part/sub-assembly).  It doesn't make a huge difference to the assembly process - you can constrain parts easily enough regardless of where they are with respect to the origin - but being able to use the origin planes as constraints without having to create more workplanes has its benefits.


In short, either make a copy or derive the original part and then take note of the location of its centre of gravity from iProperties.  Then use the Move Bodies command and enter those values as negatives in the offset dialogue.


A similar result can be achieved with the moment rotation, except you don't invert the values.  There is only one prompt here for the angle, leaving you manually pick the axis around which to rotate.


A couple of things to note:
- Doing this with the original part (as opposed to a copy or a derived part) will affect its position in the main assembly.
- If you intend to do both a rotation and a move, do the rotation first as it affects the positional CoG.

Of course those of you who attended this year's Micro Concepts Technical Learning Academy, will have seen this demonstrated by Peter Barker in his popular Inventor Tips and Techniques session.

If this is the kind of process you would like to see automated in our MC Tools package, please let us know.


30 Jul 2013

Mesh converter for Inventor 2013 +

Frustrated with the lack of options for your imported mesh files?  Autodesk has released an app called Mesh Enabler to convert your mesh features to solids, surfaces or composites, opening up productivity options that didn't previously exist.

Having tested this with a simple STL file, I can confirm that it produces surfaces and composites (relatively) easily, but I had some difficulty with solid generation.  This may be an issue with the integrity of the STL mesh itself.  Post-conversion editing tools do work but you will need some patience with your manipulation.

Available free for subscription customers.

Mesh Enabler for Inventor 2013+

"The Mesh Enabler application converts mesh features to solid base features or surface features. This function can be applied to individual or multi-selected mesh features or mesh feature folders.

After installing Mesh Enabler, right click on one or more imported mesh features of interest, and convert them into Base features (solids, surfaces, or composites) through a new context menu command. The graphical mesh data is converted into B-Rep Model data that can be used similar to imported solids and surfaces."